Many rotating components have holes or slots that require shot peening for fatigue resistance and life enhancement. This discussion outlines a number of methods used to peen holes, including:
- Quadrant Peening
- Flapper Peening
- Deflector Pins
- Deflector Lances
- Rotary Lances
The hole size (length and diameter) and configuration (open ended, blind hole, limited access) will normally dictate the method used to peen the specified surface.
In general, we tend to group holes into two size categories:
- Shallow holes are those with a ratio of length to diameter less than 2, and
- Deep holes consist of holes with a ratio of length to diameter greater than or equal to 2.
We’ll begin by looking at the easiest type of holes to peen—shallow holes.
Shallow Holes with L/D < 2
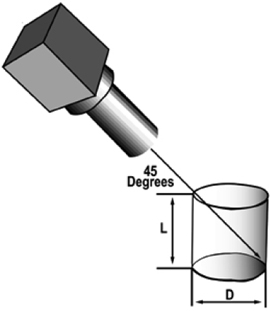
Figure 1 shows a sketch of a hole open at one end (blind hole). If the ratio of length to diameter (L/D) for the hole is less than or equal to 1, then the inner diameter (ID) can be peened using a normal direct pressure nozzle shooting at a 45° angle to the surface, as indicated.
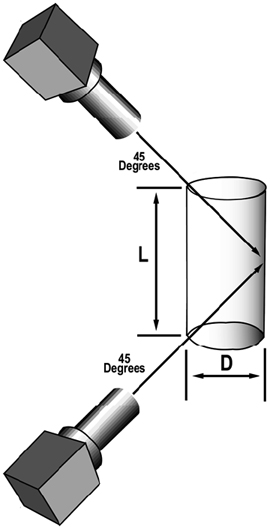
Similarly, if a hole open at both ends has an L/D ratio less than 2, then the ID can be peened using a direct pressure nozzle from the outside shooting at a 45° angle to the surface from both ends of the hole (Figure 2).
Quadrant Peening
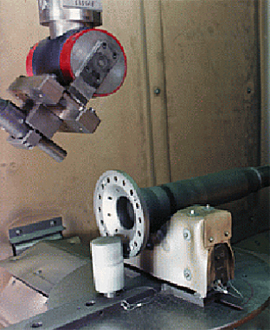
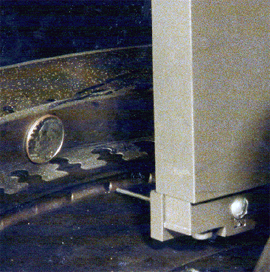
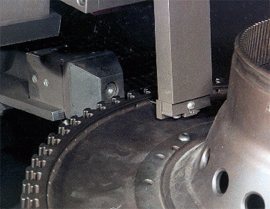
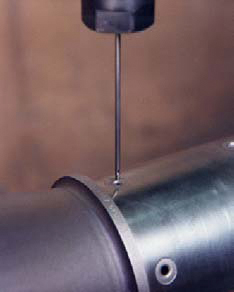
The photo in Figure 3 shows a turbine shaft with bolt holes on the flange that require peening. Since these holes have an L/D ratio < 1 they can be peened from just one side using a standard blast nozzle.
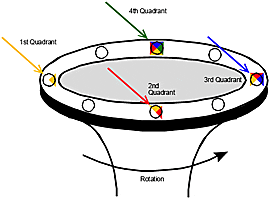
This method is called quadrant peening and involves peening the part while it rotates using standard blast nozzle(s). Each nozzle (or position) targets 1/4 of the hole diameter using a 45° angle of incidence.
Quadrant peening can be accomplished by targeting 1/4 of each ID surface as shown in Figure 4. As the part rotates, the portion of the hole that is subjected to the direct impingement of the blast stream at each nozzle location moves 90° for each 90° rotation of the part.
In most cases peening holes from the outside using direct pressure nozzles will result in the fastest process rates. However, there are numerous applications where peening from the outside is not feasible or the hole L/D ratio prevents complete coverage. In these instances, alternate methods are required such as captive shot peening, deflector pin peening, deflector lance or rotating lances.
Deep Holes with L/D ≥ 2
Flapper Peening
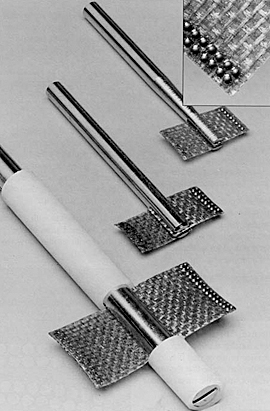
Some small holes may be manually peened with a device called a Roto Peen Flap Assembly manufactured by 3M (Figure 5). This device is a captive shot flap technology using high-strength resin to bond tungsten carbide shot to a flexible polymeric flap. The shot particles are sized to 0.0330″ shot size, and typically produce intensities in the 0.008″–0.015″ A range.
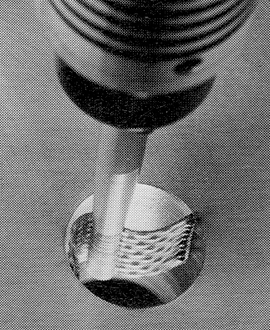
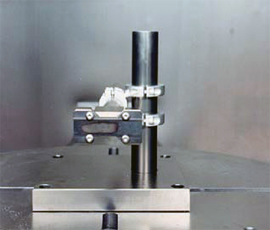
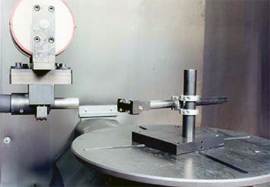
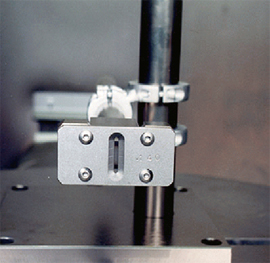
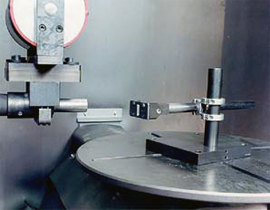
Two polymeric flaps are bonded together and placed in a mandrel which rotates. This type of system is very portable and convenient to use for in-service rework applications. Holes down to 1/2″ diameter can be peened using Roto Peen Flaps (Figure 6).
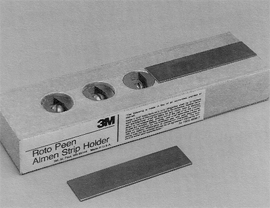
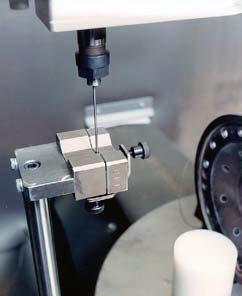
It is important to note that special Almen fixtures are required when Roto Peening (Figure 7). The Almen strips are not held down by screws found on a typical Almen block, but rather by magnets.
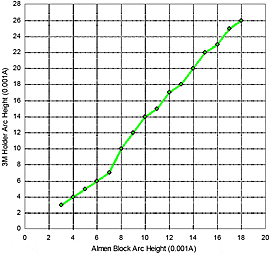
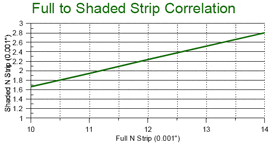
Since the Almen strip is not constrained during peening it bends more so a correlation is required between typical Almen arc height readings and those produced with Roto Peen Flaps as shown in the diagram in Figure 8.
Deflector Pin Peening
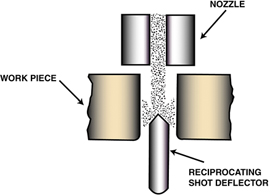
If a small hole is open at both ends, a normal direct pressure nozzle can be used to peen the ID if used in conjunction with a deflector pin. Figures 9 & 10 show 0.170″ diameter cooling holes in an aircraft turbine disk.
A 0.070″ deflector pin is translated through the hole from one side while a 1/8″ direct pressure nozzle shoots straight down the hole ID from the other side. As the pin moves through the hole, shot is deflected off the tip of the pin and ricochets into the side of the hole ID (see Figure 11).
The deflector pin tip is normally made with a 45° angle, and must be hardened or made of carbide to withstand the abuse of peening. Sometimes the pin is rotated along its axis to help ensure that even coverage is provided due to slight differences in surface configurations of the pin.
For the example shown above, the hole needed to be peened to a 0.005″–0.008″ A intensity with S110 cast steel shot. The intensity verification procedure uses shaded strips (discussed later) to measure the intensity of the peening process inside the 0.170″ diameter hole.
Deflector Lance Peening
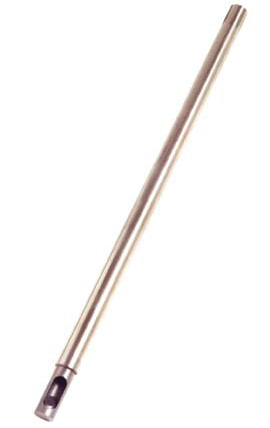
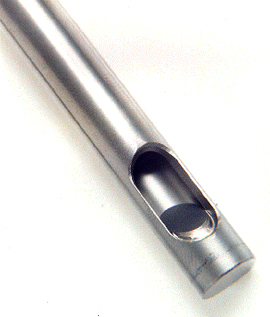
Deflector nozzles have long been used for blast cleaning pipe ID’s, however there are also deflector lances which are made specifically for shot peening (Figure 12).
These lances are typically made using Carbide tips for wear resistance and durability. They can be made in a wide range of sizes and lengths, and are used many times for peening very deep holes.
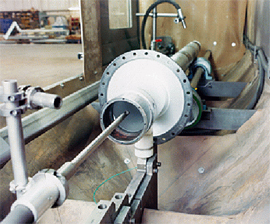
A good example for deflector lance peening is the ID of a turbine shaft as shown in Figure 13. Here a bearing journal on the shaft ID must be peened as part of a repair. The deflector lance is translated into the shaft bore while the shaft is rotated along its long axis. The lance tip has a 45° deflector so that the media exiting the nozzle is hitting the part at nearly 90° when the lance is parallel with the hole.
The main drawback to standard deflector lance peening is that the lance itself does not rotate, so the part must be rotated about the bore to be peened. Many rotating components have bores along their centerline due to their rotational nature, however there are other parts which are much more difficult or impossible to rotate due to their size or geometry. For these kinds of applications, peening with a rotating deflector lance is preferred.
Rotary Lance Peening
Deflector pin peening and deflector lance peening both have limitations. Many times a part’s geometry doesn’t lend itself to deflector pin peening since you must have open access to both ends of the hole. Also, it is somewhat difficult to ensure even coverage within the hole with deflector pin peening, even with pin rotation. Some parts are too large or cumbersome to peen with non-rotating deflector lances. Therefore, many hole ID peening applications now utilize rotary lances.
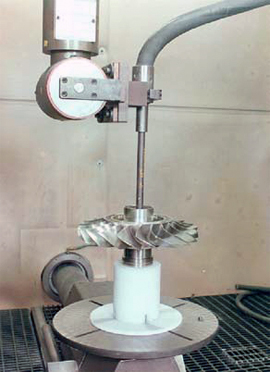
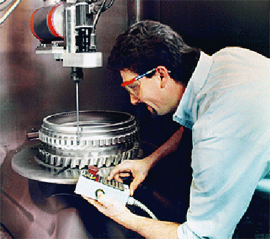
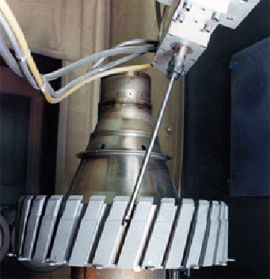
Rotary lances are deflector lances that connect to a mechanical drive and rotate along their axis. When used in conjunction with a programmable manipulator, rotary lances offer a flexible method for peening a wide variety of geometries and surfaces that are difficult to reach by conventional methods.
Lances for rotary lance peening come in a variety of diameters and lengths and are now available for peening holes as small as 0.100″ (2.5mm) diameter. Made from wear resistant carbide, these lances attach to a closed-loop rotation drive and are fed media through a hollow bore in the drive.
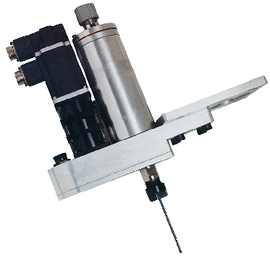
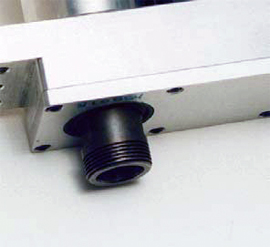
The servo controlled rotary lance drive (RLD) has variable speed capability up to 150 RPM and monitors for zero speed alarm conditions (Figure 16). A mounting plate allows users to bolt this unit up to almost any motion device. Typical changeovers from standard blast nozzle to rotary lance drive take less than 5 minutes on a Progressive machine.
Since many ID lance peening applications are for critical rotating components which cannot have lance to part contact, lance runout is a major concern. Rotary lance drive designs must take this into consideration so that the lance does not contact the ID surface due to alignment and runout problems.
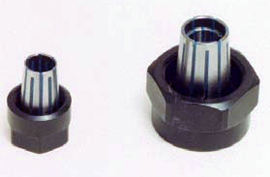
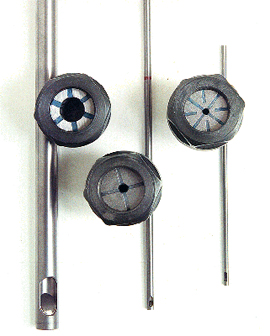
Compression collets (Figure 18) are used with the lances to ensure consistent mounting and alignment. Two collet sizes are used; one for lances up to 3/8″ diameter, and another for lances up to 5/8″ diameter. The collets thread onto the end of the drive bore providing precision mounting and optimum lance concentricity. This two piece collet/lance design also results in lower lance replacement costs.
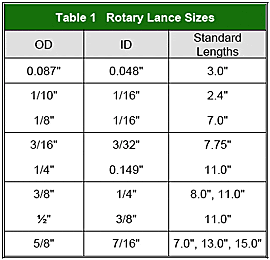
A variety of different lance sizes are available (see Table 1). All lances are 100% carbide, with deflector tips and exit geometries optimized for minimum energy loss.
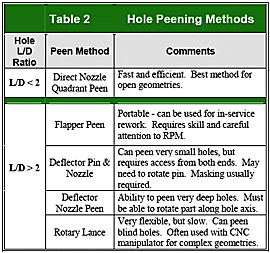
Table 2 summarizes the hole peening methods discussed and lists some criteria to consider when deciding which method to use. Keep in mind that it is almost always faster to peen holes using standard nozzles if you can.
For holes smaller than 0.750″ (19mm) diameter, a full Almen strip cannot be used to simulate the hole surface. In these situations, shaded Almen strips may be used and correlated with full strips (reference SAE AMS-2430L, para. 3.2.2.1).
Intensity Verification For Small Holes
Once you have determined the best method to peen a hole or slot, the next step is setting up and verifying your process parameters. Figure 22 shows a good example of a small hole peening application where use of a full strip is not feasible.
In this example, the hole to be shot peened is about 0.140″ (3.7 mm) in diameter. The peening requirement is to shot peen the hole ID to an intensity of 0.011″–0.013″ N. In this case we chose to use a small rotary lance with an outer diameter of 0.087″ (2.2 mm) and used AWC14 cut wire shot.
Before we could establish the process parameters needed to peen the hole with the lance, we first needed to develop correlation data between full Almen strip readings and Almen strips that were only peened for 0.140″ of width corresponding to the hole diameter. To do this, we performed the following:
Procedure for Correlating Almen Strip Readings for Small Holes
- Set up a standard Almen block with the appropriate size Almen strip mounted. Using a standard direct pressure nozzle mounted to an automatic manipulator, develop a saturation curve for the lower end of the specified intensity range. We will use the lower range for the turbine shaft oil hole of 0.011″ N (11 N) for this example. Using Progressive’s new computerized saturation curve solver we entered our arc height data and produced a calculated intensity T1. Normally multiple sets of data are used to get more repeatable results. We next verify our calculated intensity by using the corresponding T1 feedrate and peening an Almen strip.When the calculated intensity is confirmed by your actual arc height reading at the T1 feedrate, proceed to step 2.
- Now mask off an N strip so that only the center of the strip is exposed, with the exposed surface width equal to the ID of the hole to be peened. See Figures 25 & 26. Masking can be accomplished with vinyl masking tape or with fixed masks. Precision hole masks from Progressive are shown.
- Using the masked off Almen strip fixture, peen using the 11N intensity parameters determined in step 1. Measure the shaded Almen strip arc height Your “shaded strip” arc height reading for the 11N-T1 parameters is your corrected N strip reading for the lower range of your specification.
This reading will be less than 11N since only a small portion of the test strip was peened and therefore the strip will have less deflection. Record this corrected N strip or “shaded strip” reading. This will be your target reading for the lower end of the specified range when peening with your rotary lance. - Now perform steps 1 & 2 again for the upper end of the specified range 0.013″ N (13N).
- When complete you should be able to generate a chart like Figure 28 showing a plot of full strip arc height versus shaded strip correlated values. This chart tells us that to peen the hole to 11-13N intensity, we need to have a shaded strip reading of between roughly 2.0 N to 2.5 N.
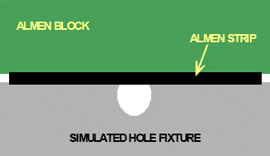
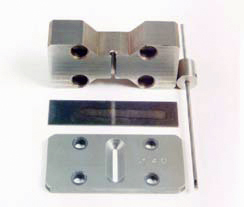
- Once you have determined the correlated intensities for the lower and upper range of the specification, you then must develop the process parameters to duplicate these readings using a rotary lance and simulated hole fixture. The simulated hole or slot fixture (Figure 29) should resemble your actual part configuration and take into account ricochet that may occur during peening.
- Select an appropriate sized lance for your hole. In this case we selected a 0.087″ diameter lance for a 0.140″ diameter hole.Mount an N strip in the Almen block and attach the hole simulation block to the fixture so that only the hole diameter will be exposed to the shot stream by the lance (Figure 30).
- Using the rotary lance and automated machinery, develop and record process parameters that will produce an arc height centered between the lower and upper correlated arc heights for the specified range found in step 5. Again, make sure that you have adequate coverage when visually inspected with 10x magnification.
Please note the procedure outlined above is just one of a number of methods used to determine intensity for surfaces which cannot easily accommodate a full Almen strip. Other methods include peening a full strip with a lance which effectively paints the entire strip surface over a number of passes, and also using miniature strips.
It should also be noted that the author could not find any specification which clearly defines how areas smaller than a standard Almen strip width shall be checked for intensity. Given this fact, it is Progressive’s recommendation that the SAE Aerospace Materials Engineering Committee clarify this issue with a written specification or addendum to an existing specification defining how small areas should be checked for intensity.
Anyone familiar with shot peening also knows that you can get all sorts of Almen gage readings on brand new un-peened Almen strips. When setting up a new peening process it is sometimes helpful to use a correction technique to account for the pre-bow condition of new strips.
If shot peening in accordance with SAE AMS-2432B for computer monitored shot peening, you may find it advantages to compensate for the initial pre-bow or out-of-flatness condition of your Almen strips (reference SAE AMS-2432B, para 3.2.4).
This AMS specification requires Almen strips to have a flatness tolerance of ± 0.0005″ (± 0.013 mm). Although this specification does not outline a particular method for compensating Almen strips, a generally accepted method for performing this technique is as follows:
- Measure both sides of an Almen strip to ensure within ± 0.0005″ (± 0.013 mm) flatness. Don’t use if either side exceeds this specification. If either side of a strip measures 0.0000″, write a “0” on the side measured and make sure that this side is mounted face down in the Almen block. Otherwise, find the side of the strip with the lowest absolute reading, and write down the reading on that side of the strip.For example, if my strip has one side reading +0.0002″ and the other side reading -0.0001″, use the -0.0001″ side and write down “-1” on that side of the strip with an ink marker pen. The number is always assumed to be in 1/10,000ths.
- Mount the Almen strip in your Almen block with the measured side down, away from the peening source. After peening the Almen strip, measure your arc height and then subtract the value found on the back of the strip from the gage reading to find your corrected Almen strip reading.
Example: Let’s use our pre-bow reading from above of “-1″ and say that after peening we get an Almen strip reading of 0.0114”. We then look on the back of the strip and find that we originally had a correction of “-1″ representing an initial reading of -0.0001”. Subtracting our pre-bow reading from our current gage reading gives us a corrected Almen strip reading of: 0.0114″ – (-0.0001″) = 0.0115″
A modification of this procedure is to only use Almen strips with initial pre-bow readings that are positive, so that the convex side of the Almen strip is peened. Then the pre-bow reading is subtracted from the peened Almen strip measurement.
Summary
As the reader can see, there are a variety of ways to peen small holes. Shallow holes can be peened using just about any of the methods discussed here, however some are more efficient than others. For deep holes the method used will depend on accessibility.
Many tools of the trade are required to perform hole peening properly. Yet, contrary to what some in this industry would lead you to believe, it is a process that most shot peeners can accomplish.

